Adding a chatbot to Messenger
Introducing Facebook Messenger integration
You can deploy the same chatbot, with the same knowledge base, on your website and on Facebook Messenger.
This means you can automate the answering of frequently asked questions, wherever your customers are asking them. All your chat forms and escalations will work on Messenger too.
To set up your bot in Messenger, you'll first need to create a Facebook app, and then connect it to your chatbot.
This article describes the steps you need to take, and the information you'll need to provide to the Helpfruit team. It also details some chatbot elements that will appear differently on Messenger.
In this article...
- Introducing Facebook Messenger integration
- Prerequisites
- Create a Facebook app
- Provide info to Helpfruit team to connect your bot
- Complete configuration in Facebook
- Test your bot
- Complete App review
- Make the app public and publish the Page
- Set the API version
- Configure and test your bot in Facebook
- Messenger documentation
Prerequisites
Before you get started, you will need:
- A Meta for Developers account. If you don't have an account, you can create one at developers.facebook.com.
- A Facebook page from which users will access your bot. If you don't have one yet, Create a new Page.
- A Premium Helpfruit subscription. Messenger bots are not available on Starter or Standard plans. See pricing.
-
A unique icon image for your app
-
Files must be between 512 x 512 and 1024 x 1024 pixels and in JPEG, GIF or PNG format. File size limit 5 MB.
-
-
Contact information for a Data Protection Officer, if you are doing business in the European Union
-
A URL link for the Privacy Policy for your app
- A separate Meta for Developers account for testing your app (note, credentials will need to be shared with Meta App reviewers)
Create a Facebook app
Users will access your bot from a Facebook Page. To connect the bot, you'll enable Facebook Messenger on the Facebook Page and then connect the bot to the Page.
Create your app
- Sign in to your Meta for Developers account.
- Click Create App
- Select Other and click Next

- On the Select an app type page, select Business and then Next.
- Add a name for your app, check the contact email address and click Create app
- If prompted, enter your password
- Optionally, you can link this app to an existing Business Account using the dropdown menu, or you can add this later.
- After your app is created, the site goes to a page for your app.
This completes the app creation flow. Your app will be loaded and you will be able to select the products, permissions, and features you need to build your app.
Configure your app
- Expand Settings and select Basic.
- Copy and save the App ID and App Secret.

- Copy and save the App ID and App Secret.
- Now under Settings, select Advanced.
- In the resulting pane, scroll down to the Security settings, and enable Allow API Access to app settings.
- Select Save Changes.

Enable Messenger
- Select Dashboard.
- In the resulting pane, scroll down to the Messenger tile and select Set Up.
- The site adds Messenger settings to your app and displays the settings page.

Add pages and generate tokens
-
Under Messenger, select API Settings.
-
Scroll down to Generate Access Tokens and select Add or Remove Pages.
- When prompted for the identity to associate with Messenger, either continue with your current account or sign in to another.
- When prompted for the Pages you want to use with your app, select the relevant page(s) and then select Next.
- If prompted to submit the request for Login Review, review the information and select Done.
- On success, the site displays a success page. Select OK to continue.
-
The Page you added now appears in the Pages list.

Copy and save the Page ID for later.
-
Select Generate token for the Page.
- The site displays security information and gives you a chance to copy the token.
- Read and acknowledge the warning.
- Copy the token and select Done.
You now have your app information and a token for the next step. Leave the Facebook setting steps pending. You'll update them later.
Provide info to Helpfruit team to connect your bot
To configure your Helpfruit chatbot for Messenger, you'll need to provide the following information to the Helpfruit team:
- Your Facebook App ID and Facebook App Secret (from Create your app - step 5, above)
- Your Page ID and Access Token
Once we have completed setup for Messenger on your bot, we'll let you know that you can proceed with the next step.
Complete configuration in Facebook
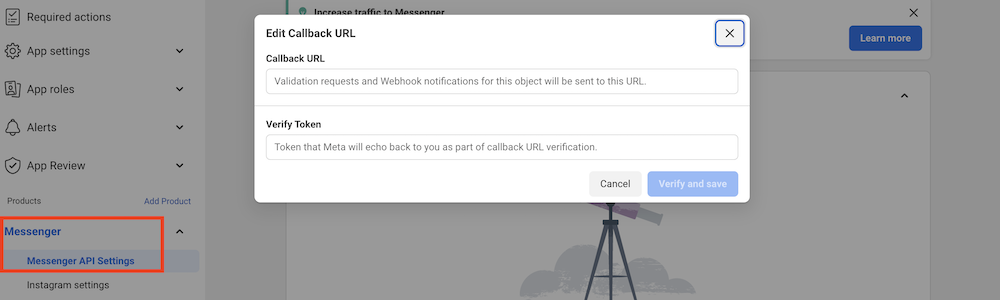
Go back to the Facebook settings to finish up the configuration process. On the Meta for Developers site, go back to the Messenger API settings page for your app.
Configure webhooks
-
- Enter the Callback URL and Verify Token values provided by the Helpfruit team.
- Select Verify and save.
Click Add subscriptions
On the Edit page subscriptions page, select the following subscription fields and click Confirm:
-
-
- messages
- messaging_postbacks
- messaging_options
- message_deliveries
-
Test your bot
Until an app is published, it's in Development Mode. Plugin and API functionality will only work for admins, developers, and testers.
Testing your bot
Only the creator (the Facebook Dev account that created the page and bot) can get a bot response. Normal Facebook users can't see the page or the bot. Give developer or test roles to target users, so they can also chat with the bot.
Users to be added to tester roles must first register on the Meta for Developers site. The tester role is not available to Facebook users that don't have a Meta for Developers account. For more information about app roles and test users, see the Meta for Developers developer documentation.
You may need to make some adjustments on the Helpfruit side - especially for engagements/buttons. See chatbot features in Facebook Messenger
Once you are happy that your chatbot is working as expected in Messenger, you can submit your app for review.
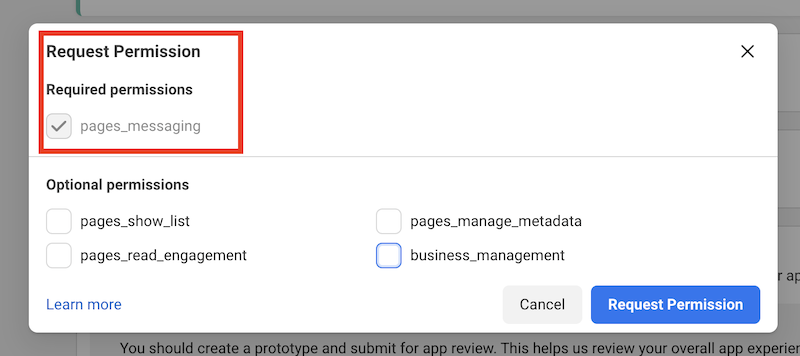
Complete App review
- Go to step 3 on the Messenger API Settings screen - Complete App Review
- Request the relevant permissions - you will need pages_messaging
- Complete the following App review steps
- Business verification (learn more) - your organisation may already have completed this
- Answer questions about data handling
- Review App Settings
- Add details on how your app will use the requested permissions - answer the specified questions and provide a screencast
Contact us for guidance on wording and screencast content as the requirements are quite specific.
The App Review process can take 10 days or more, and may require revisions depending on the individual app reviewers. The bot will be tested to ensure it's compliant with Facebook's Platform Policies.
Make the app public and publish the Page
After the review is successful, in the App Dashboard under App Review, set the app to Public. Ensure that the Facebook Page associated with this bot is published. Status appears in Pages settings.
Set the API version
If you receive a notification from Facebook about deprecation of a certain version of the Graph API:
- Go to Meta for Developers.
- Go to the app you created for your bot.
- Under Settings, select Advanced.
- Select Upgrade API version, then switch Upgrade All Calls to the latest version.
Test the connection by following the steps described below.
Configure and test your bot in Facebook
Verify that your bot is connected to Facebook correctly, by sending a message via the Facebook Page associated with your new Facebook app.
- Go Facebook and switch to the profile for your page.
- Select more actions (…), then Edit (or add) Action Button.

- In the resulting dialog, under Get people to contact you, select Send Message.

- Select Next, complete the dialog and save your changes.
- In the resulting dialog, under Get people to contact you, select Send Message.
- Switch back to your personal profile.
- Go to your page, and select Message to test the connection to your bot.
Messenger documentation
For Facebook Messenger documentation for developers, see: